Apple uses a password and an email address to simplify tasks for users and give them access to applications. You need to confirm that you are the legitimate account owner; otherwise, the system will treat you like an intruder. However, sometimes, you may not want to set the ID on your MacBook, or you may want to use multiple versions simultaneously.
So, can you use a MacBook without an Apple ID? A MacBook can be used without an Apple ID. Although it’s not recommended as an Apple ID provides access to various features and services, such as iCloud, iMessage, FaceTime, the App Store, and iTunes, it is not mandatory for using the basic functions of a MacBook.
When setting up a new MacBook or after a factory reset, the setup process will prompt the user to sign in with an Apple ID or create a new one. However, the user can skip this step and create a local account instead, which allows them to access and use the MacBook without an Apple ID.
By doing so, the user will miss out on some Apple services and features, but the core functionality of the MacBook will remain accessible.
You can skip using Apple ID since as it is not mandatory, during setup, but Apple advises against it because you cannot access vital applications unless you have one. Also, you cannot update your MacOS or use the App Store to download applications directly to the MacBook. Luckily, most tasks do not depend on having the ID, but overall, the user experience will decrease.
You may be sharing your MacBook and need multiple Apple IDs, or you want to avoid setting it up. The Apple ID may be useful for any iDevice owner, but not every user wants it. You may have a MacBook but have reservations about the ID syncing with other Apple gadgets. Therefore, is it necessary to have an Apple ID before using your MacBook?
You can use a MacBook without an Apple ID. You don’t need an Apple ID If you want to avoid syncing with other Apple gadgets. You can still operate usual tasks on your computer, but the general user experience will diminish.
Without the ID, you will lose access to the App Store, meaning you won’t download apps directly to the MacBook. Luckily, some platforms requiring the credentials give users options to ignore.
If you own an Apple product, one of the first things to do during the setup is to get an Apple ID. The chances are high that any iPhone, iPad, or other iDevice user has one. On the downside, some owners are skeptical about it, especially if they don’t want it to sync with their other Apple gadgets.
Otherwise, it means setting a new ID, which may be tasking. Luckily, you have a way out if you don’t want your MacBook to run with an Apple ID.
Apple has not made it mandatory to have one, and you can skip it in the initial setup. However, the company advises against it because the credentials make it easier to access Apple’s applications and software improvements.
Without it, the user experience changes since you cannot directly find the services you need from Apple. For instance, there is no other way to access the App Store; thus, you can’t download new applications.
If the main reason behind not wanting an Apple ID is because you want to avoid automatic syncing with your iPhone or iPad, note that there is a remedy for this. Instead of skipping the setup, you can turn off iCloud and syncing, which will stop it from linking with other iDevices without your consent. It helps when you share your Mac and want to keep your data from other gadgets safe.
Apple may encourage it, but thankfully, apps you need to access using your Apple ID usually have an alternative escape route. Also, it is not compulsory for an iDevice to have an Apple ID. You can always go to iCloud.com and set up one from whichever gadget you own.
It serves as a free email with benefits like cloud storage and simplified access to all Apple gadgets. Lastly, remember that platforms like Apple Music, FaceTime, iMessage, iTunes, Mac App Store, and many others require the ID before access.
How Do I Bypass Apple ID Setup on Mac?
Thanks to systems like Apple ID, Apple has strict security protocols to ensure that your data is safe from unscrupulous individuals. However, it is common to forget your ID, or you may have bought a used Mac, and you need to access it without the credentials. The following is an elaborate way to circumvent the hurdle.
To bypass the Apple ID setup on your Mac during the initial setup process, follow these steps:
- Turn on your Mac and wait for the setup process to begin.
- Choose your preferred language and region.
- Select a keyboard layout.
- Connect to a Wi-Fi network, or choose “My computer does not connect to the internet” if you prefer not to connect at this time.
- When prompted for data and privacy information, click “Continue.”
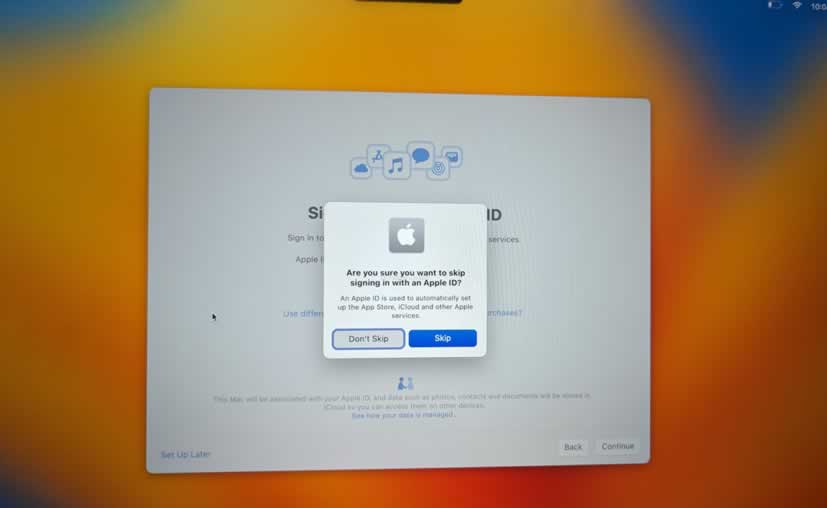
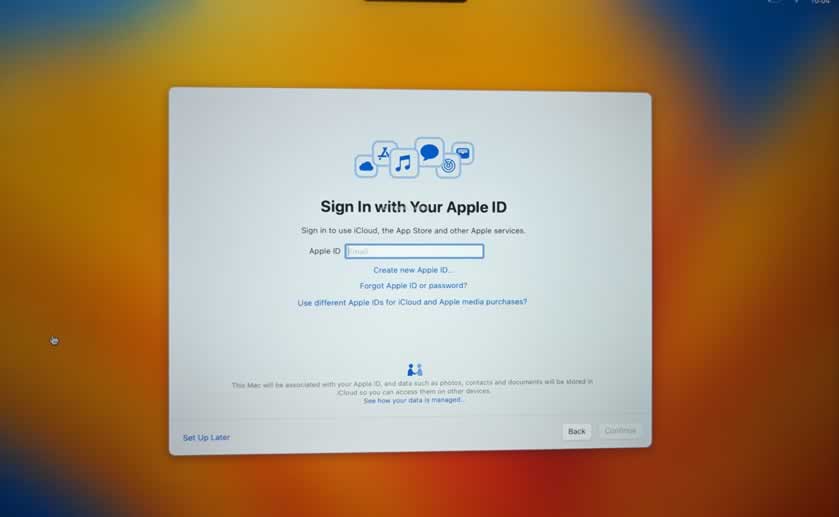
- You’ll arrive at the “Sign in with your Apple ID” screen. Instead of signing in, click on the “Set up Later” option located at the bottom.
- A message will appear asking if you’re sure you want to skip signing in with your Apple ID. Click “Skip” to confirm.
- Continue through the remaining setup steps, such as creating a local user account, setting up Find My Mac (if desired), and choosing the “Look” for your Mac.
Once the setup process is complete, you can use your Mac without an Apple ID. However, you will not have access to certain Apple services and features like iCloud, iMessage, FaceTime, the App Store, and iTunes.
To bypass Apple ID set up on your new Mac, you can skip the process during start-up when a dialogue box appears asking you to either set the password or ignore it. If you avoid the steps, you can comfortably use your iDevice without any pop-ups unless you restart the computer.
If you set up a used Mac, you can circumvent the procedure by contacting Apple to deactivate the lock. An easier alternative would be to find the previous owner to help you unlock it remotely.
You can effortlessly bypass the setup stage on your brand-new Mac. Immediately after starting it, the system will ask you whether you want to use the Apple ID. If you cancel the pop-ups, you will access the gadget and use it normally.
However, you will have to repeat the process whenever the computer shuts down or restarts. Some users prefer leaving the MacBook on sleep to avoid the relentless prompts where the system stays inactive and uses negligible power.
Furthermore, you may have set an Apple ID but forgot it, or you recently acquired a second-hand Mac and want to reset it with your preferred password. Here, you can consult with Apple customer service through their website for them to help you unlock the passcode. Apple support will gladly help you bypass the lock if you have the requisite documents like the purchase receipt.
Removing Apple ID from iCloud is also an alternative way to access your Mac without an activation lock. You will need to enter iCloud and sign in, find your Mac and erase it from your list of devices.
Remember that the procedure will wipe every data you have on the computer; therefore, it is vital to have a backup. Once you erase the activation lock, you can now use the laptop as it is or reset a new password.
If you don’t prefer the iCloud procedure, you can instead employ the software. There are Apple lock removal tools to consider but be cautious about using a genuine version. First, you will install the app on a different computer, connect the Mac and start the unlock tool. The software will download the computer’s firmware, and once it’s ready, click “Unlock” to delete the ID.
After a successful unlock, the software will let you know, allowing you to start using the Mac intact or configure another passcode. On the other hand, tech-savvy individuals can bypass the Apple ID using the iCloud DNS.
The method isn’t widely used, and only a few individuals can work it. If you need to apply it, ensure that you get the process right; otherwise, you may harm the Mac.
Can a MacBook Have Two Apple IDs?
It takes only a few steps to get an Apple ID, and it’s common for users to have multiple versions for their iDevices. This way, the IDs work independently. One pressing question among new MacBook owners is whether they can use their multiple IDs on their devices.
While a MacBook cannot be linked to two Apple IDs simultaneously, you can still have multiple user accounts on the device, each associated with a different Apple ID. This way, each user can access their own Apple services, preferences, and files when logged into their account.
Here’s how to create a new user account on your MacBook:
- Click the Apple menu in the top-left corner and select “System Preferences.”
- Click “Users & Groups.”
- Click the lock icon in the bottom-left corner and enter the admin password to unlock the settings.
- Click the “+” button below the list of users.
- Choose “Standard” or “Administrator” from the “New Account” dropdown menu.
- Enter the new user’s full name, account name, password, and a password hint, then click “Create User.”
After creating the new user account, the person can log in with their Apple ID during the setup process for that account, allowing them to access their Apple services and features. By switching between user accounts, you can effectively use multiple Apple IDs on the same MacBook.
If you want to share your Mac with others and want exclusive Apple ID use, the only option is to set up multiple user accounts. Therefore, everyone will enter their Apple IDs when they use their accounts.
The Apple ID’s design is for users to access services from the company by confirming that they are legitimate account owners. Therefore, the credentials can only work with one device at a time, applying to all Apple products.
However, one workaround allows you to use two IDs when accessing iTunes and iCloud on the same device. From your computer, click System Preferences, select iCloud, and then use one Apple ID to sign in.
Afterward, scroll to iTunes, tap Account, and click Sign In, allowing you to type in your other credentials. Doing this allows you to open the two applications using different IDs. However, Apple advises users to have only one password for all apps on their MacBooks.
Using multiple credentials can be confusing and lock you out of access to some applications and Apple’s services. It is the only exception because otherwise, there is no other way to have more than one Apple ID on your MacBook.
If your friends or family want to share the computer and access services using personal Apple IDs, the only option is to have separate user accounts. Besides, services like Family Sharing make it easier to share apps and other platforms.
You can also set different accounts, maybe if you want one for business and personal use. The only challenge with several accounts is to remember the credentials for each.
macOS links your settings and data to each user ID for added safety, ensuring that each user’s information stays private. It works for home and office setups where there is a single device, this way, no one opens private accounts or erases another person’s data.
To set separate accounts, go to the Users settings, tap the lock symbol, enter your password, and tap Unlock. Next, click the + below, configure any new account you want to use, and click Create user.
How Do I Remove Previous Owner from Apple ID on Mac?
Generally, most Apple users set their IDs during the first use, and the password remains on the Mac until you change or delete it. If you buy a used laptop and the owner forgot to erase it or doesn’t know how to edit it, you will need to know how to remove it to regain access.
To remove the previous owner’s Apple ID from a Mac, you’ll need to sign out of their account and then perform a factory reset to erase all personal data and settings. Here’s how to do it:
Sign out of iCloud:
a. Click the Apple menu in the top-left corner and select “System Preferences.”
b. Click “Apple ID” or “iCloud” (depending on the macOS version).
c. In the sidebar, click “Overview”, then click “Sign Out.”
Sign out of iMessage:
a. Open the Messages app.
b. Click “Messages” in the menu bar and select “Preferences.”
c. Go to the “iMessage” tab and click “Sign Out.”
Sign out of the App Store and iTunes (if applicable):
a. Open the App Store, click “Store” in the menu bar, and select “Sign Out.”
b. For macOS Mojave or earlier, Open iTunes with macOS Mojave (including earlier versions) click “Account” in the menu bar, and select “Sign Out.”
Perform a factory reset:
a. Restart your Mac and immediately hold down “Command” + “R” keys to enter Recovery Mode.
b. Once in Recovery Mode, select “Disk Utility” and click “Continue.”
c. Select your startup disk (usually named “Macintosh HD” or “Apple SSD”) and click “Erase.”
d. Choose “APFS” as the format, and click “Erase.” After the process is complete, close “Disk Utility.”
e. In the main Recovery Mode window, select “Reinstall macOS” and follow the on-screen instructions to reinstall a fresh copy of macOS.
After completing these steps, the previous owner’s Apple ID will be removed from the Mac, and you can set it up as a new device with your own Apple ID.
To remove the previous Apple ID on a MacBook, you can first ask for the credentials or direct the owner to remotely use iCloud to unlock the laptop. If you can’t find them, there is third-party software that will assist you in erasing the old password.
You don’t have to consult the seller if you have all the passcodes since you can always enter the details and access whatever you need. However, Apple IDs tend to sync with other iDevices, and if the owner wants to keep their data safe, the best way is to unlock it remotely.
The process will be easier If you have the previous owners’ Apple ID and passwords. Note that sometimes they may be reluctant to disclose it since they may be using it for other platforms.
The alternative method is to unlock it remotely, and you can guide them through it if they are unfamiliar with it. First, using another Apple device, log into iCloud’s website using the available password and Apple ID.
Next, click on Find My and choose All Devices, then select your Mac and tap the erase option. After a successful edit, press “Delete From Account” to completely remove the previous owner’s Apple ID. All the data in your computer would be gone, needing a backup system before initiation. Alternatively, there are solutions if you don’t have the needed passwords.
iTunes can come in handy in assisting with resetting the Mac and erasing the old Apple ID. Download the application on another iDevice, link the two gadgets, and then follow the simple prompts on your screen to restore the computer.
You can use third-party software to remove the previous owner’s Apple ID without the activation lock. You will download the software on a separate computer and install it.
Start the app, choose the unlock Apple ID option, connect the Mac to the other device, and initiate. The steps involved are straightforward to complete in no time. Factory resetting is also an effective option, but like iCloud, it will also require the Apple ID and passcode. Dial-in the menu bar and navigate to find System Preference.
Next, choose “Erase All Content” and Settings, insert your password and click Ok. Lastly, confirm the configurations to complete the action. The screen will turn dark, and you can wait a while before it lights up again. However, dealing with older Apple IDs may be troublesome, but you can insist on buying used Macs from reputable dealers to avoid such challenges.
Wrap Up
As with other Apple gadgets, the Apple ID is essential for users. Not only does it help with accessing applications and software updates, but it is also an elaborate way for the system to confirm that you are the legitimate owner of the gadget. However, if, for some reason, you don’t want to use it on your MacBook, Apple has not made it mandatory.
You can even skip it during setup and remove a previous owner’s credentials. On the other hand, if you find it necessary, remember that you cannot use multiple IDs on the same Mac unless you set up multiple user accounts, each with different IDs.
